How to show taps on the iPhone using a Bluetooth mouse
When a video is being recorded or when you are demonstrating the app remotely to the client, you must make sure clicks/taps are visible, so the client can follow along and see where you have clicked on the screen as you move your cursor.
In the previous article, We’ve learned, how to show touches on iOS Simulator or iOS devices using custom gestures.
There are certain limitations with accessibility features already. For example, Justin Lake commented on the article, that he couldn’t scroll the page and accessibility features would be disabled after a certain period of time.
Throughout this article, we will learn how to show taps on your iPhone/iPad by connecting a Bluetooth mouse.
Connect Bluetooth mouse to an iPhone
As a first step, make sure Bluetooth is enabled on your iPhone and Bluetooth mouse is on and discoverable.
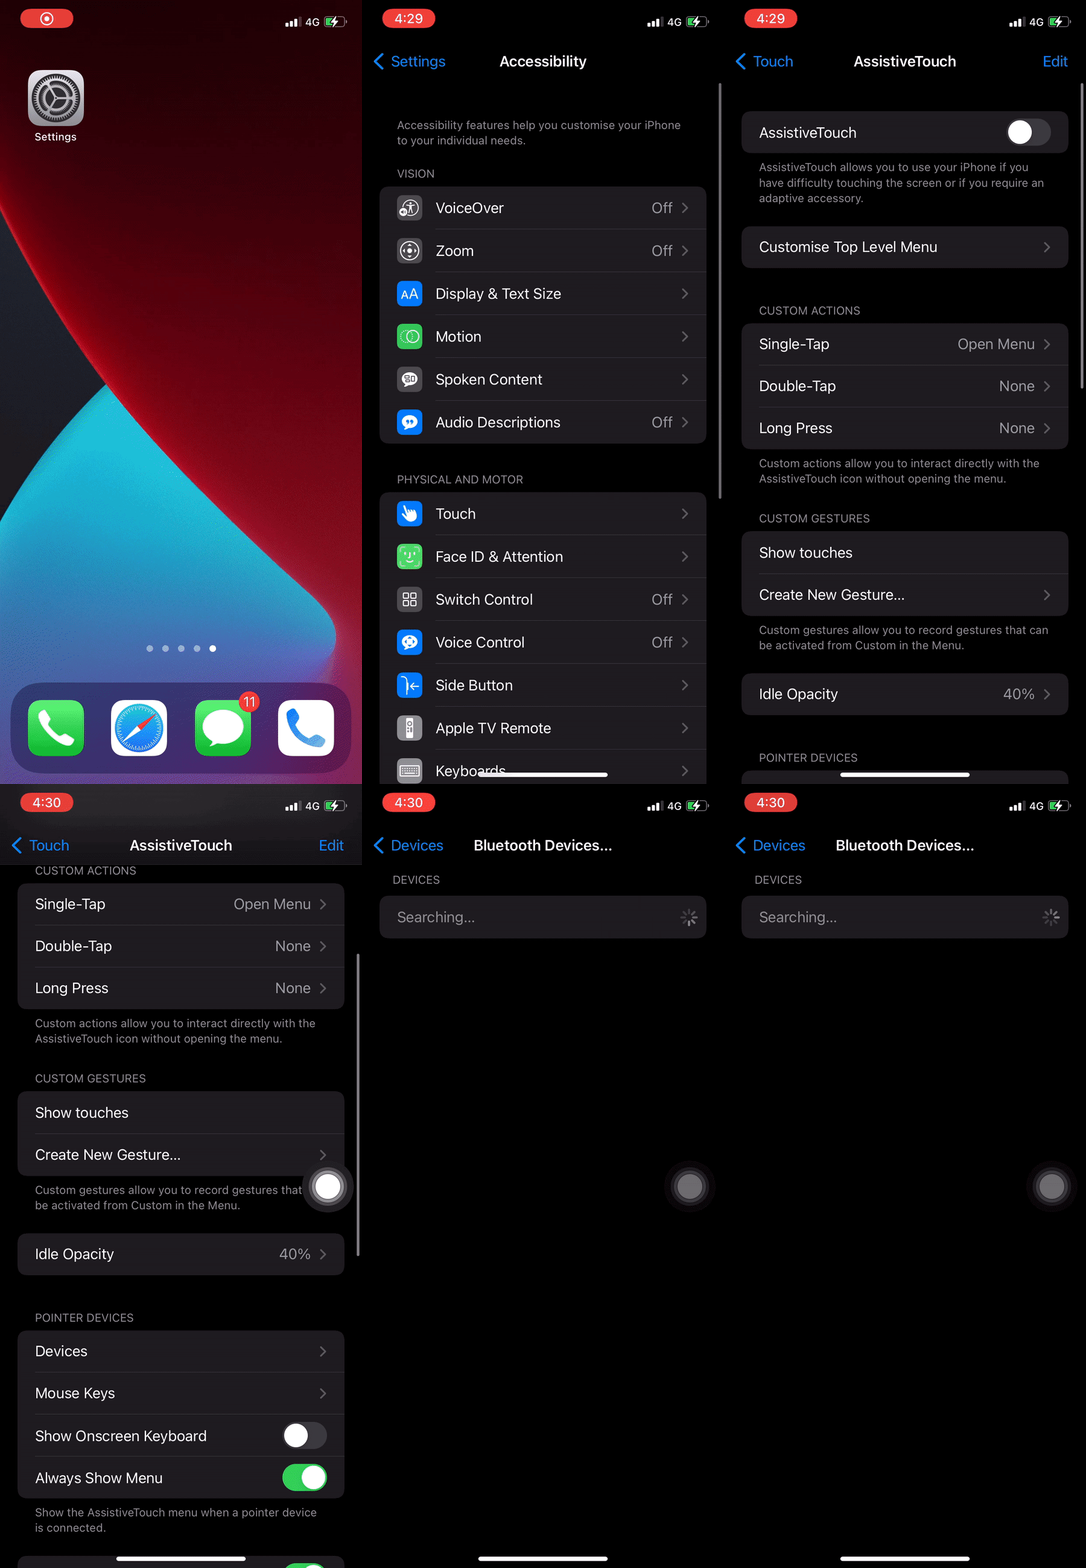
- Open the Settings app on your iPhone.
- Go to Accessibility ➞ Touch ➞ AssistiveTouch
- Turn on AssistiveTouch through the toggle at the top. It’ll turn green and the floating AssistiveTouch button will appear.
- Next, Scroll down to the Pointer Devices section and tap Devices.
- Then tap on the “Bluetooth Devices…” button
Now iPhone will start searching for available Bluetooth devices. Tap the name of the mouse you want to use. If you’re asked for a PIN when you pair your mouse, type “0000” (four zeros). After entering the number, tap Pair.
Most Bluetooth devices come with a default PIN of “0000”, but you should check with your manufacturer if needed.
Once you have connected your Bluetooth mouse to your iPhone, you can now use your mouse to click on the screen and show your audience exactly where you are clicking.

Connect Bluetooth mouse to an iPad
Prior to iPadOS 13.4, you had to use the Accessibility menu to pair the Bluetooth mouse. But now you have the option of using the Bluetooth interface directly.
To begin with, make sure Bluetooth is enabled on your iPad and your Bluetooth mouse is turned on and discoverable.
- Open the Settings app on your iPad.
- Press the Bluetooth option and turn it on.
- On that screen, you should see the name of your mouse under a section called Other Devices.
- Tap the name of the mouse you want to use.
- You might get a “Bluetooth Pairing Request.” If you do, press Pair.
When you see the new circular pointer moving around the screen, you’ll know it’s working. If it isn’t moving, try it again.
Note: Mouse devices are available separately. Not all mouse devices are fully compatible with all models of iPad.
Pro tip: By following the same steps, you can also connect your existing mouse to your iPad if you have the correct accessories.
Customize settings
After you’ve connected your Bluetooth mouse to your iPhone/iPad, it’s time to customize it by adjusting tracking speed, secondary click, and natural scroll.
Adjust the color, size, or Auto-Hide time — On iPad
- Go to Settings ➞ Accessibility.
- Select Pointer Control.
The pointer will move as you move your input device.

Adjust the color, size, or Auto-Hide time — On iPhone
- Go to Settings ➞ Accessibility ➞ Touch.
- Select AssistiveTouch, then select Pointer Style.
The pointer will move as you move your input device.
Tweak the speed for the trackpad or mouse
- Go to Settings ➞ General.
- Select Trackpad & Mouse.
- Adjust the tracking speed.

Alter the button assignments
- Go to Settings ➞ Accessibility ➞ Touch.
- Select AssistiveTouch ➞ Devices.
- Select the name of the device that you’re using.
- Select the button, then use the dropdown menu to choose your preferred action for each button.

Learn more
Learn more about the accessibility features on your Apple devices.
Questions?
Please feel free to comment below, if you have any questions.
If you like this article, feel free to share it with your friends and leave me a comment. Also, click on the clap button (👏) below to show how much you like the article.
Thanks for reading! 👨🏼💻
You can find me on:
Twitter | LinkedIn | GitHub | Medium | HackerRank | LeetCode | Stack Overflow

